Introduction to Test Containers: The Beginner's Guide
What do you think is worse? Testing your service with in-memory databases which would never go live on production or testing your service using mock data, the one which would come from a file or maybe a mocking framework. Nevertheless, in both cases who would test your assumptions and what if the implementation details change for the data you use in production, how will you ensure your mock data is correct? If you think neither of these is a good choice, then there’s a third option. What if you could test your service locally with much ease? If your answer is “YES” to the previous question, let me introduce you to the world of TestContainers.
What are TestContainers?
As per the official documentation, “Testcontainers is an open source framework for providing throwaway, lightweight instances of databases, message brokers, web browsers, or just about anything that can run in a Docker container.” They are essentially “Wrap around an API around a docker” which means you need to have docker installed on your machine. It allows us to run docker containers directly and are used in software testing to facilitate the creation and management of disposable containers for running tests. The necessary docker containers will be spun up for the duration of the tests and tear down once the test execution has finished, hence the term “disposable installation”.
This is the official website of this framework : https://www.testcontainers.org
Why do we need them?
Before I can get into TestContainers, let me introduce the “test pyramid”, a concept concerning the separation and number of tests for software. Unit testing, the base of the pyramid, in my opinion, does not require any further discussion. There has been so much written on the unit testing technique and tools that have been developed. Let’s talk about the integration testing stage.

The main purpose of integration tests is to check how our code will behave while interacting with other services. The dependency on installed components where the integration tests are designed to execute is a common issue while designing integration tests.
Traditionally, people use in-memory databases(example H2) to test their services. The major problem with it is that clients do not use H2 and test cases do not guarantee our code will work well with databases such as MongoDB or Postgres. Let us suppose, we are migrating from one version of postgres to another, and we are not sure if our changes are backward compatible. Test cases written against H2 will not catch bugs that occur due to incompatibility. We can easily overcome this using TestContainers and all we need to do is whenever we run a container we tie its version to whatever we are running on production.
Ultimately our aim would be to have a completely clean, up-to-date reproducible database instance which is meant solely for our tests. Docker containers are one of the most popular ways to set up a test environment on a continuous integration pipeline in advance for the services required to execute the tests. Now we have a library, known as TestContainer which compliments the integration testing well.
How to use the Test containers library in a spring boot project?
I will be discussing the basic setup of TestContainers(say postgresql) with JUnit 5. First, we need to install the required dependencies required for our use case-
testImplementation 'org.testcontainers:testcontainers'
testImplementation 'org.testcontainers:junit-jupiter'
testImplementation 'org.testcontainers:postgresql’
Next we need to understand two important annotations which might be required in our tests - @TestContainers and @Container. They tie the life-cycle of the container to the life-cycle of our tests. With the help of @TestContainer, test-related containers may be started and stopped automatically. The individual container life-cycle methods are called after this annotation locates the fields that have the @Container annotation.
In the example below, life-cycle procedures for the Postgres container will be used -
@Container
private static PostgreSQLContainer database = new PostgreSQLContainer<>("postgres:12.9-alpine");
Here we used the keyword “static” which acts like before-all and after-all and container starts once per all test methods in a class. If we do not use the keyword “static” it acts as before-each and after-each and the container starts for every test method in a class.
What happens behind the scenes?
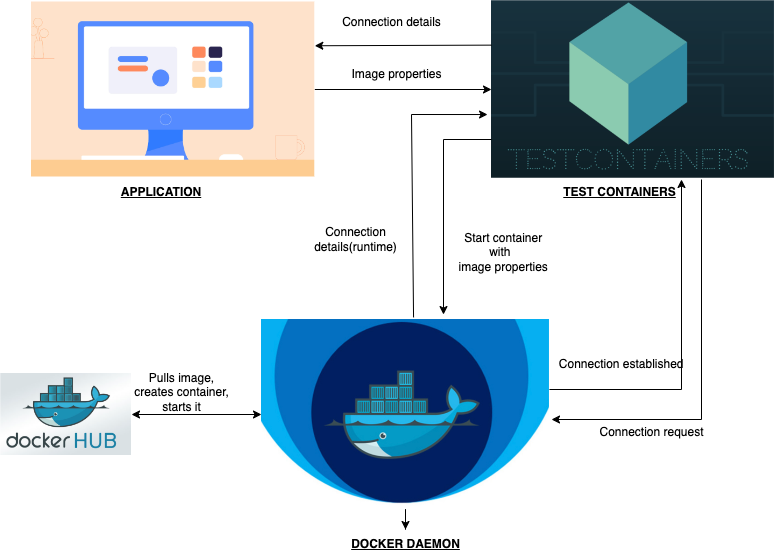
Whatever we write in @Container is being essentially converted into a docker command.

● The TestContainers library establishes a connection to the machine’s running docker daemon first (The docker daemon or dockerd listens for docker API requests and manages docker objects such as images, containers, networks, and volumes).
● Next, it searches for a postgres container using the image properties specified in the test.
● It lets the daemon pull the docker image with the required version from the official docker hub registry if it is not already present, otherwise it pulls the image from the local cache.
● The postgres container will then be started by the daemon, which will then alert TestContainers that it is ready for use. The daemon also sends some of the container’s properties. These properties include the host name and port number.
Note : The default port for postgres is 5432 and it uses this port internally within a container which would be mapped to a high level random port on our local machine.
Random ports are generated at run-time to prevent port clashing.
● The application has access to the container’s properties, which it can use to establish a connection with it. To check for which host and port to connect on we can ask the postgres container which port to connect to.
Conclusion
TestContainers is a powerful tool that can simplify the process of setting up testing environments without having to worry about configuring complex infrastructure or need to install the dependencies. It makes our integration tests a lot more reliable. The only downside is that these tests are slow compared to in-memory approaches as it takes time to pull the image and start the container. But in my opinion, the advantages outweigh the disadvantages.
You can also visit the GitHub repository for more implementation details. Thanks For Reading!